22 Classic December Nail Design for Winter Magic
December has its own kind of sparkle—twinkling lights, cozy nights, and yes, nails that demand attention. Why settle for boring polish when you could rock designs that feel like wrapping paper, snowflakes, or even a little holiday glam?
These 22 nail looks aren’t just festive, they’re the kind of magic that makes holding your hot cocoa feel Instagram-worthy. Ready to give your fingertips their winter moment?
#1. Burgundy Sparkle Fade Nail Design
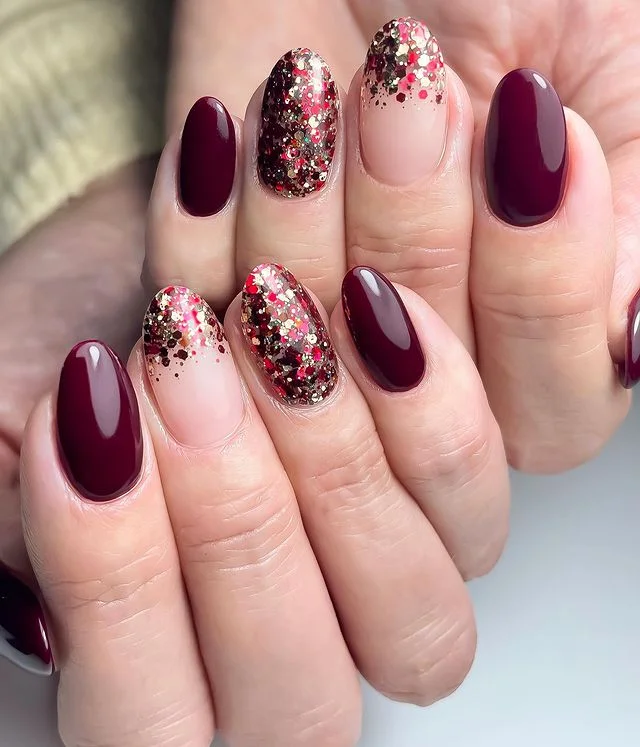
Rich burgundy meets champagne confetti—like mulled wine under fairy lights. The deep shine flatters every skin tone and instantly dresses up sweaters or party looks. Glitter gradients on a sheer-nude base keep it festive without feeling overdone.
How To Create This Design:
- Prep, shape, and apply dehydrator + base coat.
- Paint half the nails deep burgundy gel polish; cure.
- On accent nails, apply a sheer nude. Cure.
- Dab gold-red chunky glitter near the cuticle and fade upward with a sponge/silicone tool. Cure.
- Add a second glitter layer for density at the base; cure.
- Seal everything with a glossy top coat and cap the free edge.
Pro Tip: Use a makeup sponge to press glitter—less bulk, smoother fade.
#2. Gift-Tied French Nail Art
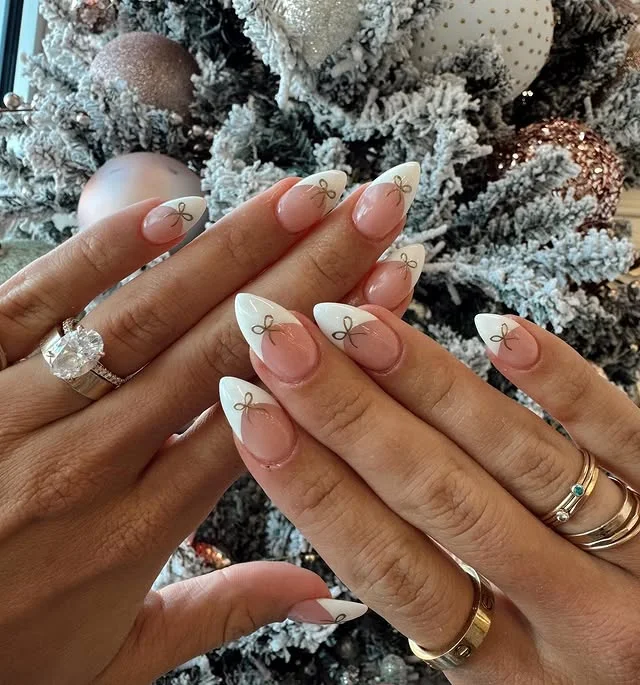
A minimalist French gets holiday magic with tiny metallic bows. Crisp white tips and a soft pink base feel polished for December brunches, engagements, and everything sparkly. The gold detail catches the light like ornaments on fresh snow.
How To Create This Design:
- Base coat over prepped nails; cure.
- Apply a milky pink builder or jelly nude; cure.
- Use white gel to paint slim French tips (guides or a fine liner help). Cure.
- Place miniature gold bow decals/charms near the smile line or paint bows with a detailing brush and gold gel. Cure.
- Lock in with a strong top coat.
Pro Tip: Float your top coat over charms, then flash-cure before a full cure to keep them from sliding.
#3. Holiday Pop Checkered Nail Look
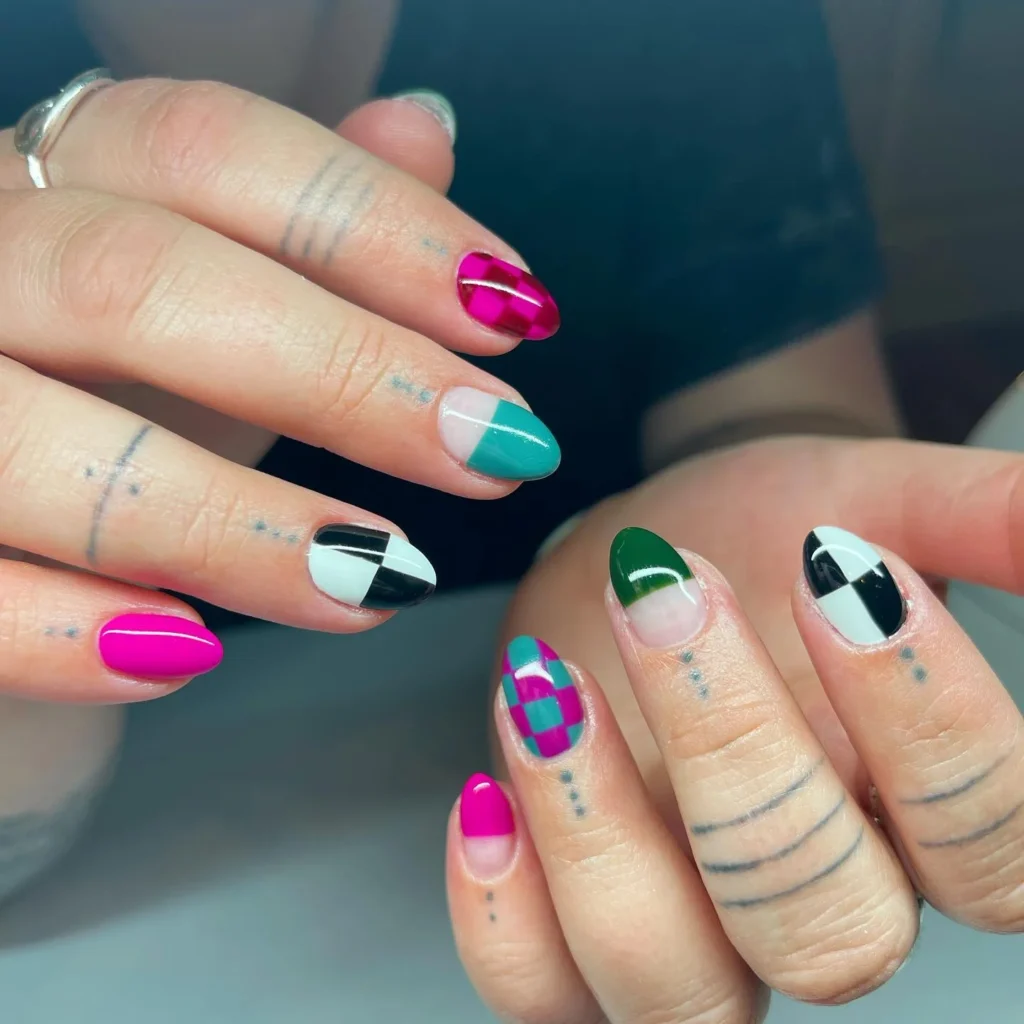
Color-blocking gets a merry remix with fuchsia, teal, evergreen, and graphic black-and-white checks. It’s playful, artsy, and surprisingly wearable—like retro ornaments translated into nails. Ideal when you want holiday energy without traditional motifs.
How To Create This Design:
- Base coat; cure.
- Paint nails in alternating blocks: hot pink, teal, green, white, and black. Cure.
- Using striping tape or a liner brush, create checkered squares on a couple nails (white+black, teal+pink). Fill and cure.
- Clean edges with a detail brush dipped in cleanser.
- Finish with a glossy top coat.
Pro Tip: Paint checks in two passes (verticals then horizontals) for sharper corners.
#4. Mulled Wine Mix-and-Match Nail Design
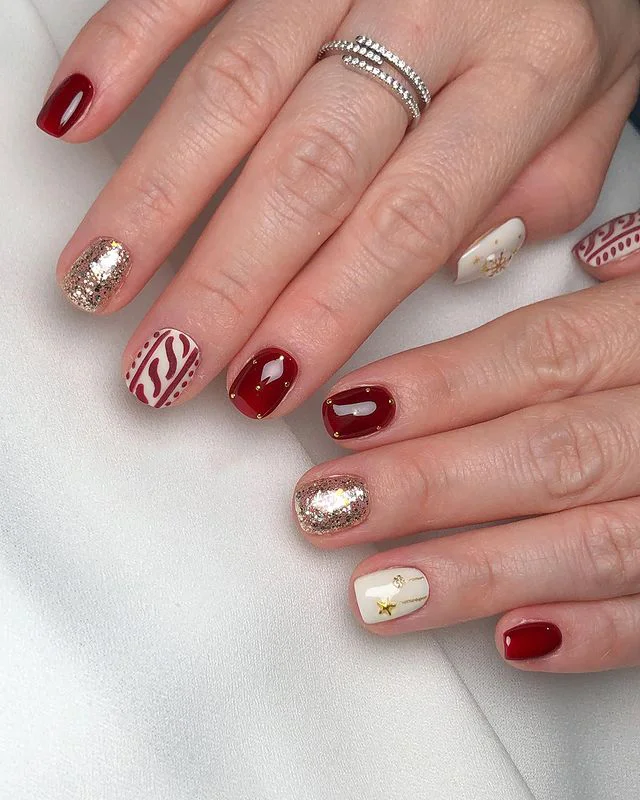
A cozy set that blends cranberry reds, gold glitter, and delicate snowflake and sweater accents. The mix of textures—cream, sparkle, and line work—reads boutique and festive. It’s the manicure equivalent of a cable-knit and a party dress sharing hot cocoa.
How To Create This Design:
- Base coat; cure.
- Paint most nails deep cranberry. Cure.
- Add a metallic-gold glitter accent nail; cure twice for density.
- On a cream base, stamp or hand-paint tiny stars/snowflakes with gold gel.
- Create a sweater knit on one nail using 3D gel or raised gel lines; flash cure between strokes.
- Top coat glossy (or mix glossy and matte for contrast).
Pro Tip: For sweater texture, apply a matte top first—raised lines grip better and stay defined.
#5. Peppermint Ribbon Nail Art
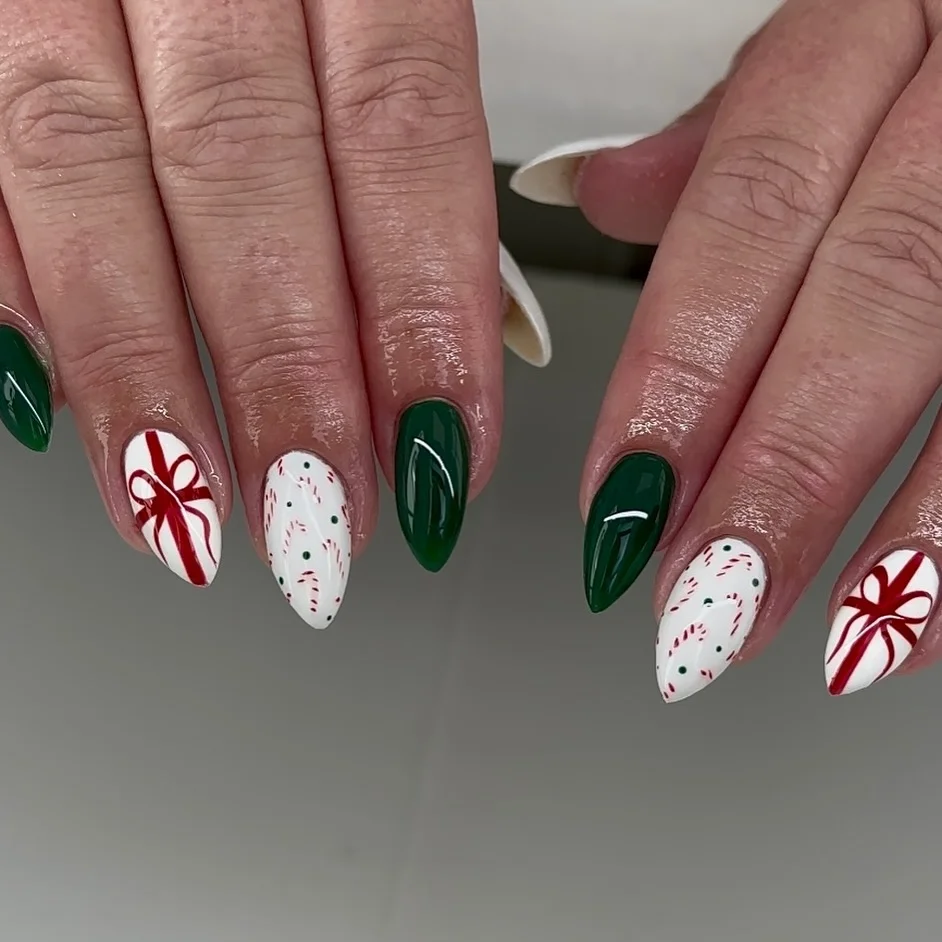
Classic green meets candy-cane white with ribbon bows—sweet without being sugary. The shade combo pops beautifully against deeper skin tones and looks crisp on fair complexions, too. It’s a cheerful nod to gift wrap and peppermint mochas.
How To Create This Design:
- Base coat; cure.
- Paint alternating nails emerald green and pure white; cure.
- Use a red liner gel to draw bows and candy-cane stripes on the white nails. Cure.
- Add tiny green and red confetti dots with a dotting tool.
- Seal with a high-shine top coat.
Pro Tip: Keep bow loops thin—negative space around them makes the design look luxe.
#6. Evergreen Plaid Nail Style
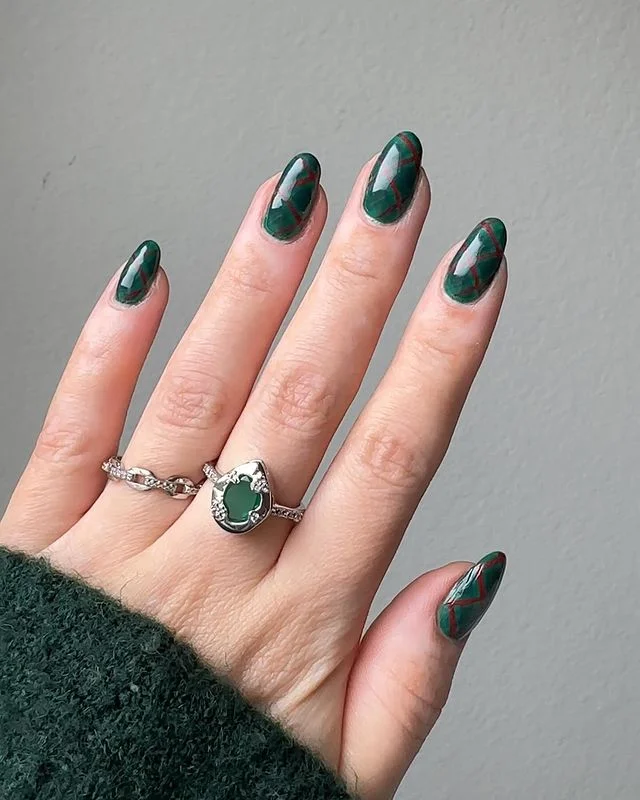
Think flannel chic: deep forest green crossed with subtle red and charcoal lines. The glossy finish feels tailored and timeless, perfect for cabin weekends or city errands. Understated enough for everyday, still very December.
How To Create This Design:
- Base coat; cure.
- Paint all nails deep green; cure.
- With a striping brush, add diagonal red lines, then finer charcoal or black lines to form plaid; flash cure between.
- Clean any overlaps with a detail brush.
- Top coat to melt lines together and add shine.
Pro Tip: Use striping tape as anchors for perfectly parallel plaid lines.
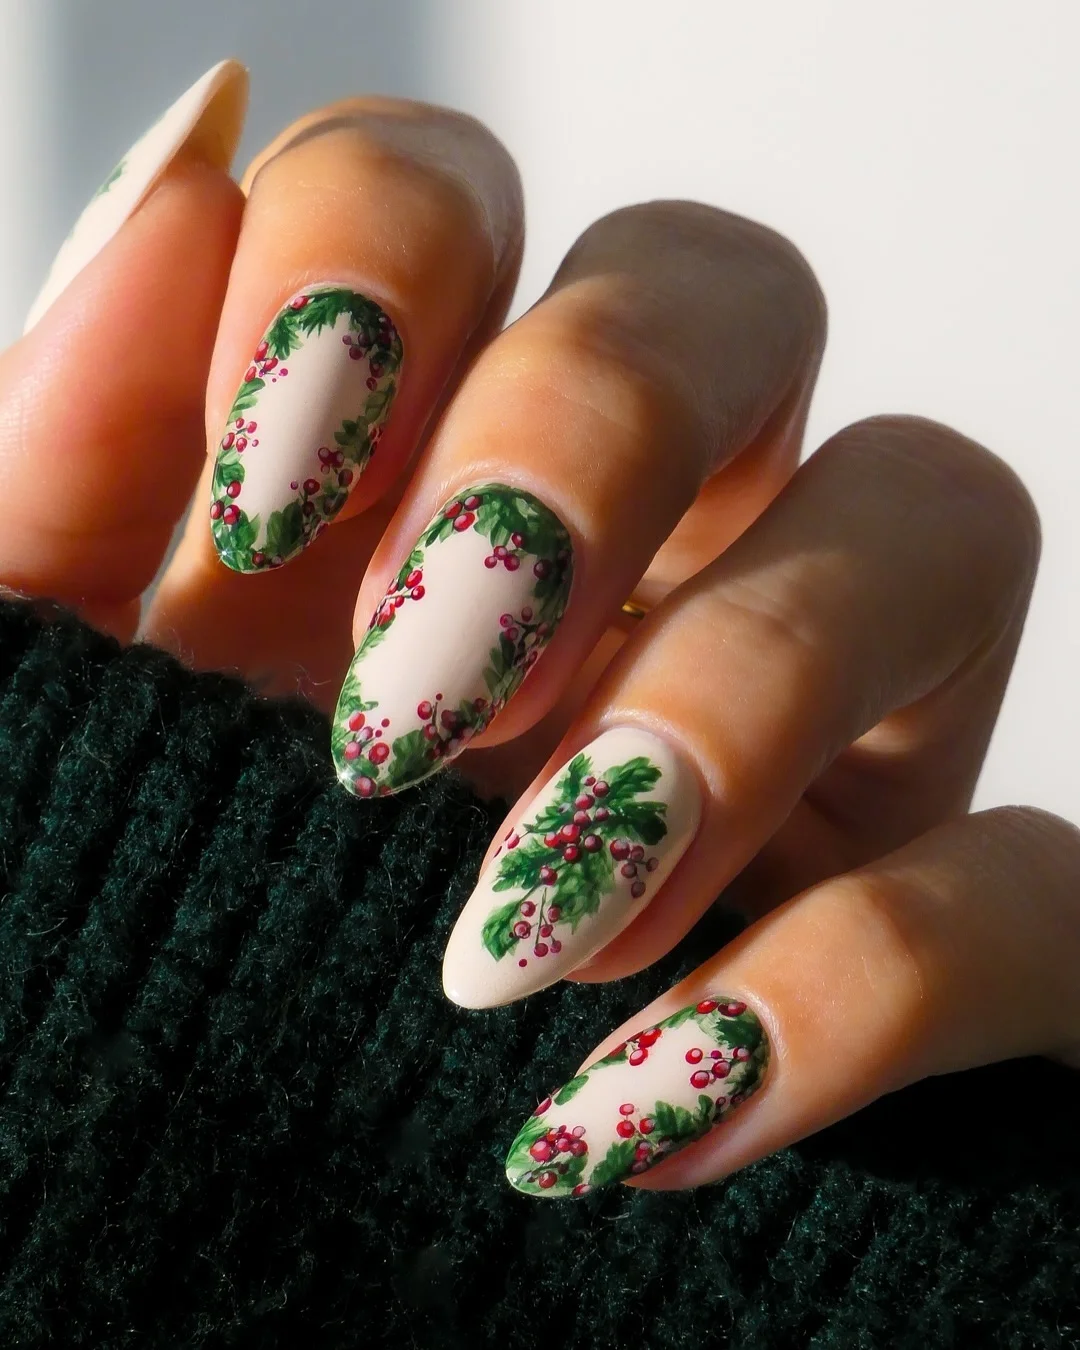
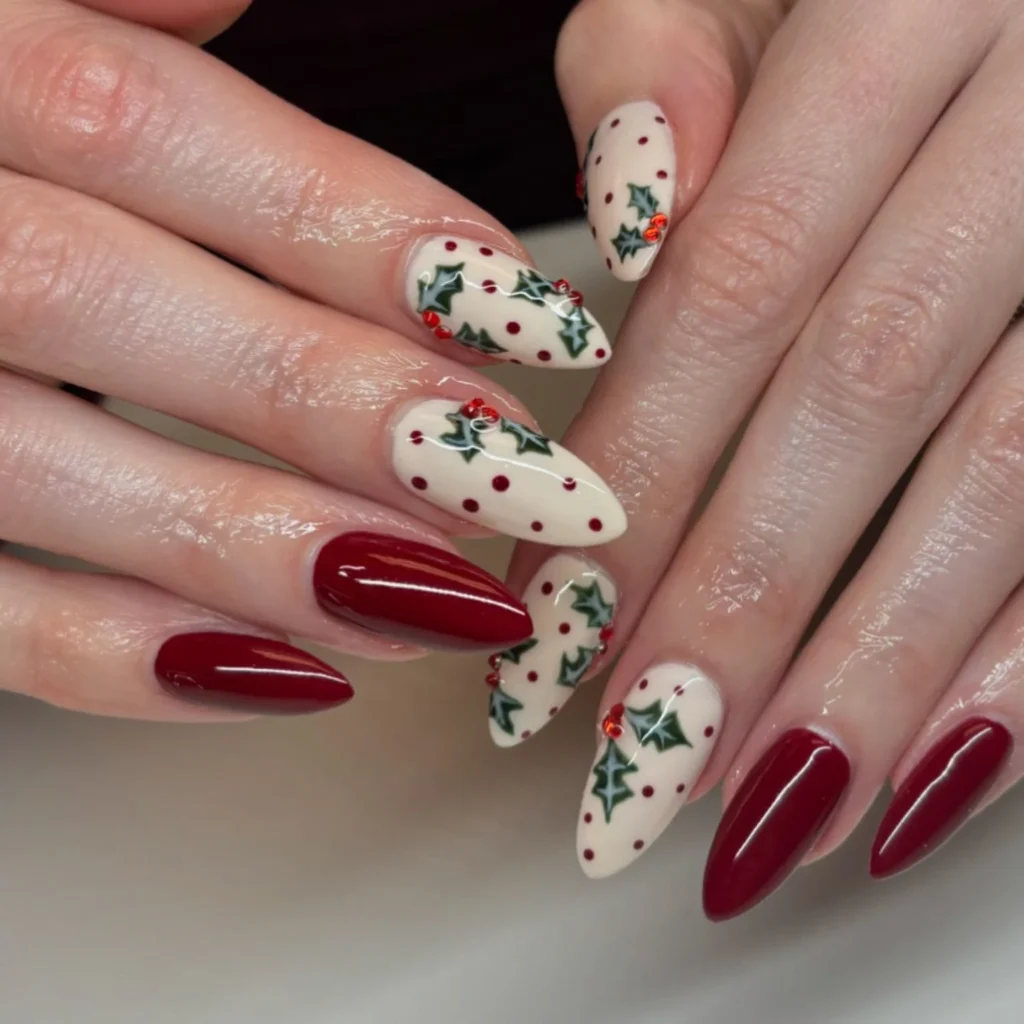
#7. Holly Sprig Nail Art
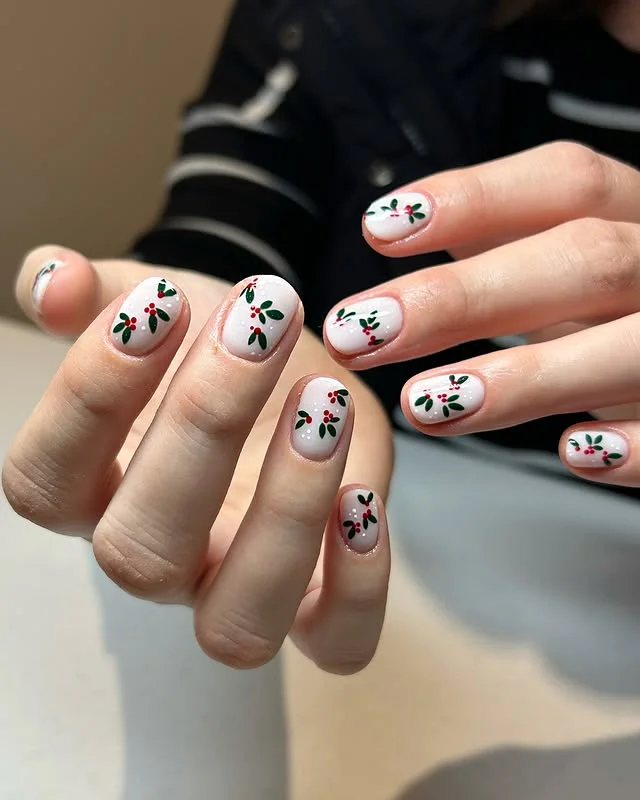
Tiny holly leaves and berries scattered over a snow-white base create a crisp, storybook vibe. Short rounded shapes keep it cute and practical for holiday baking and gift wrapping. It’s minimal art that still reads “festive” from across the room.
How To Create This Design:
- Base coat; cure.
- Apply two coats of soft white; cure.
- With a fine liner, paint small green leaf pairs; add darker green veins.
- Dot on red berry trios using a small dotting tool. Cure.
- Finish with a glossy top coat.
Pro Tip: Place berries where leaves meet—this natural clustering makes the pattern look pro.
#8. Cranberry & Cream Holiday Nail Design
Creamy ivory nails dotted with red and dressed in holly decals pair beautifully with glossy cranberry accents. The balance of light and dark flatters every outfit, from knit sets to satin slip dresses. A few gem centers add just the right sparkle.
How To Create This Design:
- Base coat; cure.
- Paint two nails deep red, the rest creamy ivory; cure.
- Add micro red dots on the ivory nails and apply holly leaf stickers or hand-painted leaves; cure.
- Place tiny red crystals at berry centers.
- Top coat to seal stones and shine.
Pro Tip: Use a thicker “jewelry” top coat over crystals to prevent snagging on sweaters.
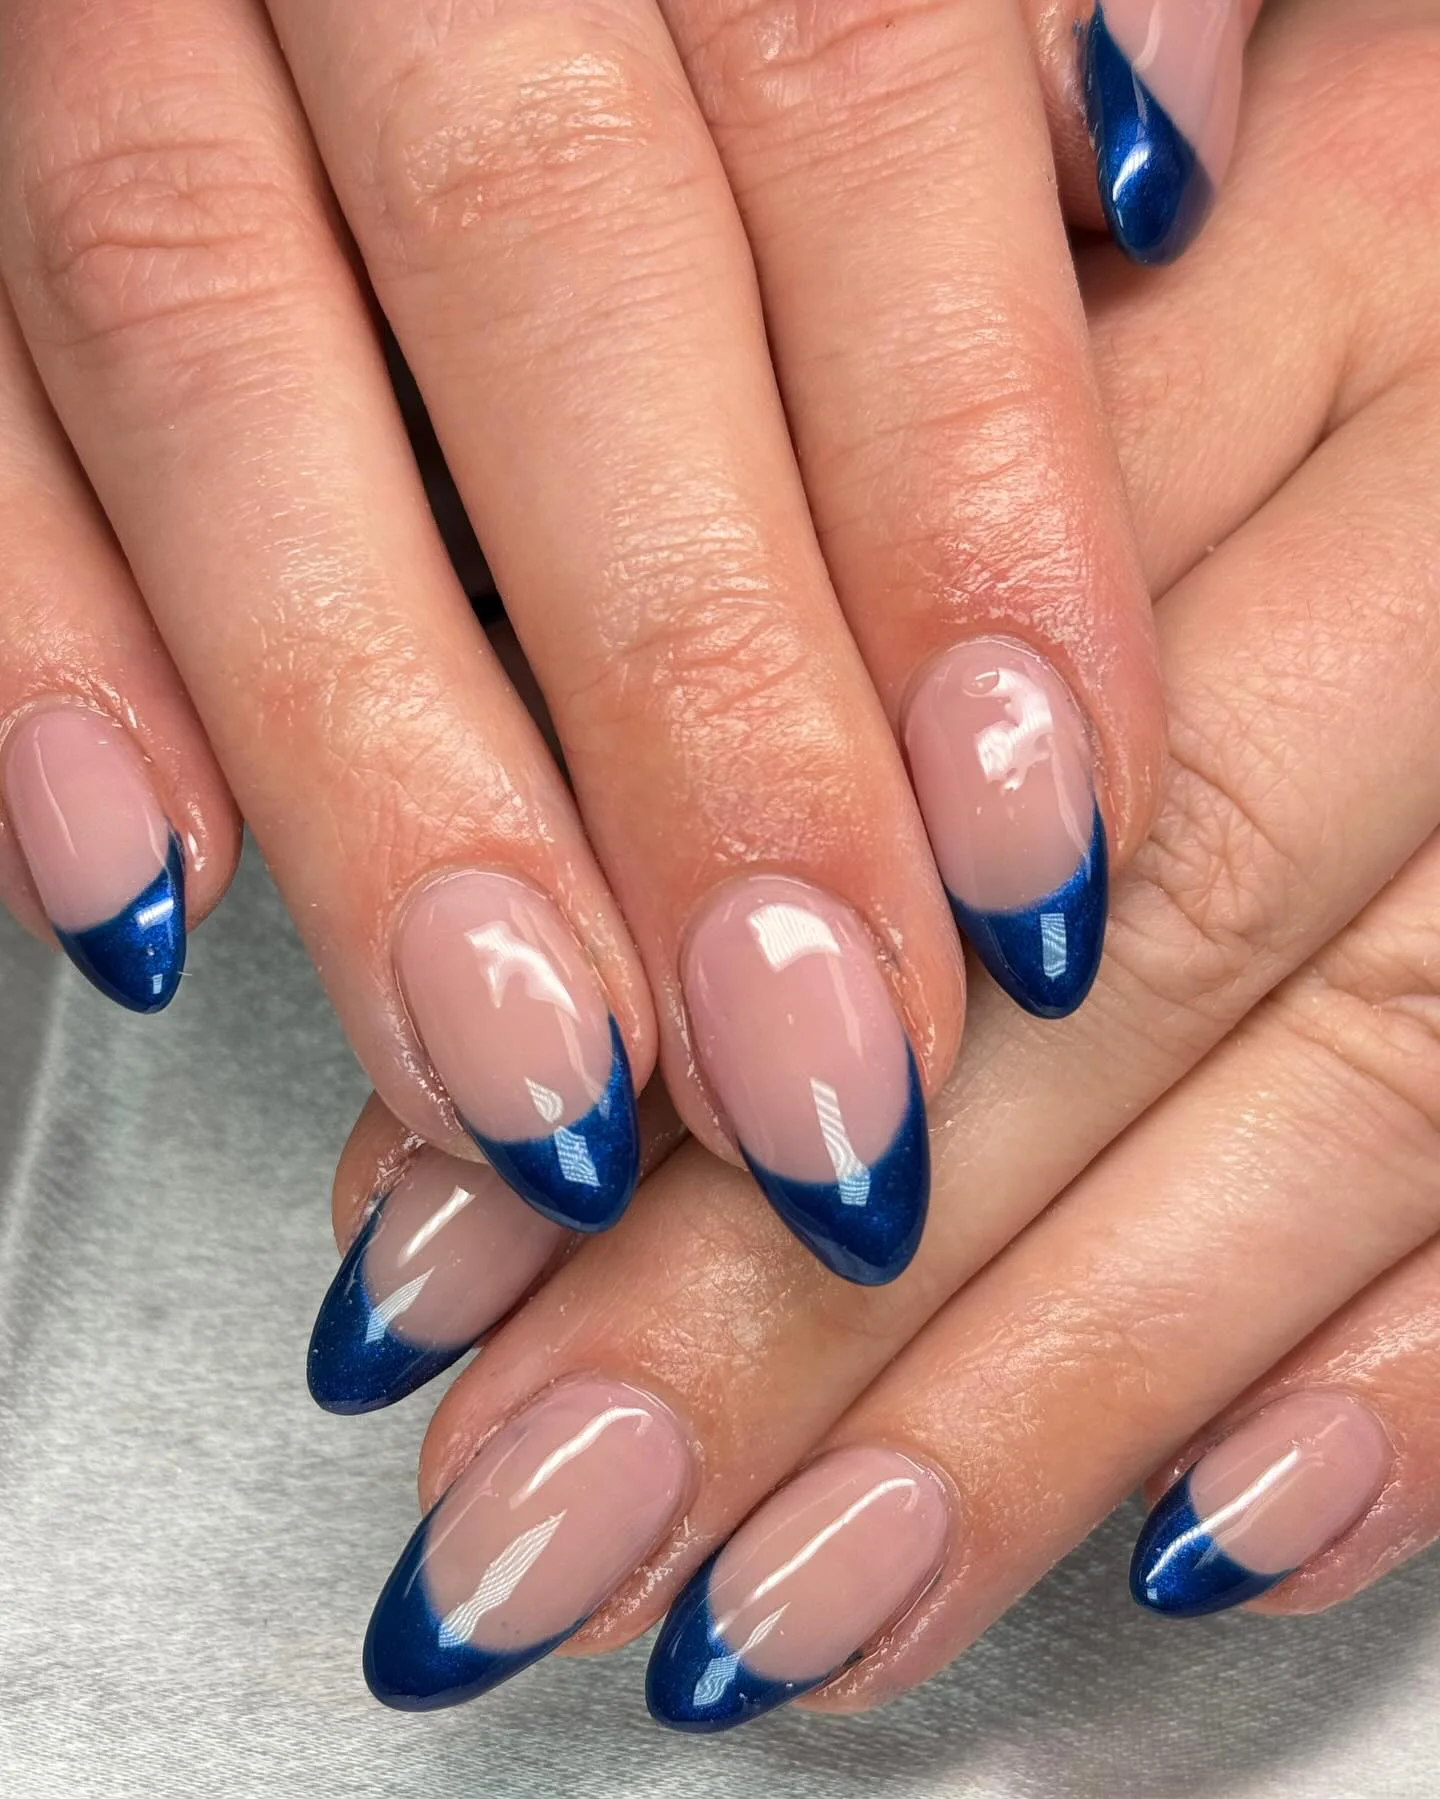
#9. Blue Blizzard Glitter Nail Glam
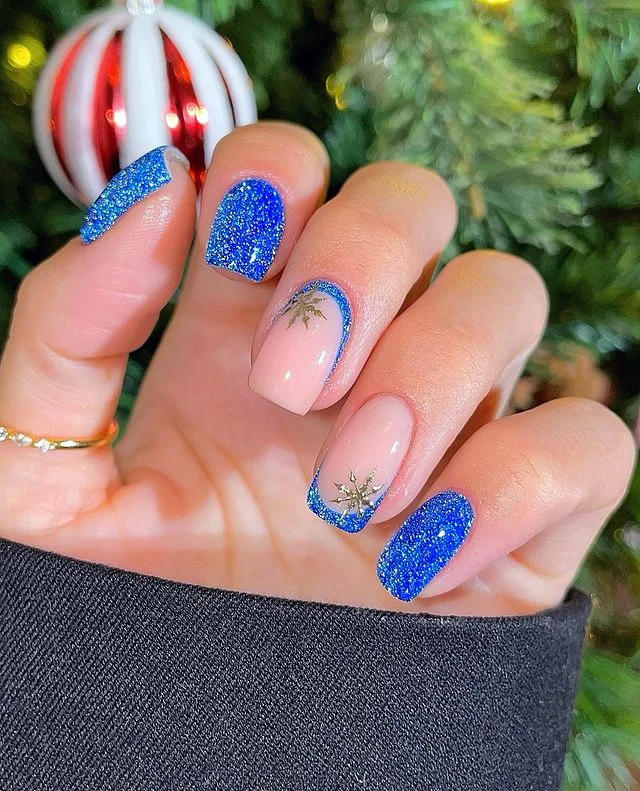
Electric blue glitter looks like fresh frost under twinkle lights. A nude base with blue-curved French lines and tiny snowflakes keeps things light and bright. It’s a bold alternative to classic red/green—fabulous for New Year’s, too.
How To Create This Design:
- Base coat; cure.
- Paint some nails with opaque blue glitter gel; cure twice.
- On nude nails, use a liner brush to create curved blue French edges; cure.
- Add silver snowflake stickers or stamp snowflakes; seal.
- Finish with a glassy top coat.
Pro Tip: For dense glitter without thickness, sandwich fine glitter between two thin gel layers.
#10. Cozy Plaid Accent Nail Look
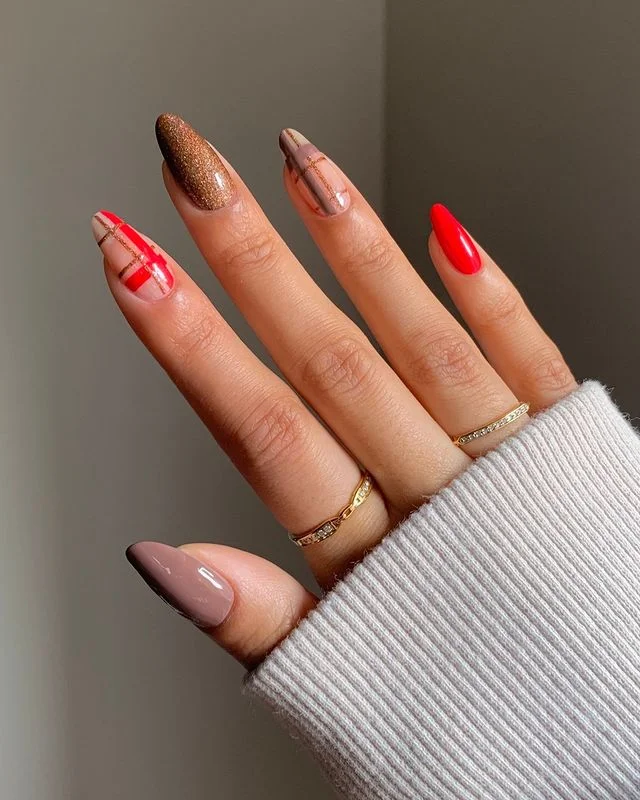
Neutral taupe, latte, and cinnamon red come together with a single plaid accent—like your favorite scarf in manicure form. Soft metallic bronze adds warmth, while the mix-and-match layout keeps it modern. Ideal for coffee dates and last-minute shopping runs.
How To Create This Design:
- Base coat; cure.
- Paint nails in taupe, nude, red, and bronze shimmer; cure between colors.
- On the accent nail, use a liner to draw thin red and gold plaid stripes over nude; flash cure as you go.
- Clean lines, then apply a glossy top coat.
Pro Tip: Keep one accent only, limiting plaid to a single nail makes the palette feel chic, not busy.
#11. White Marble Swirl Nail Art
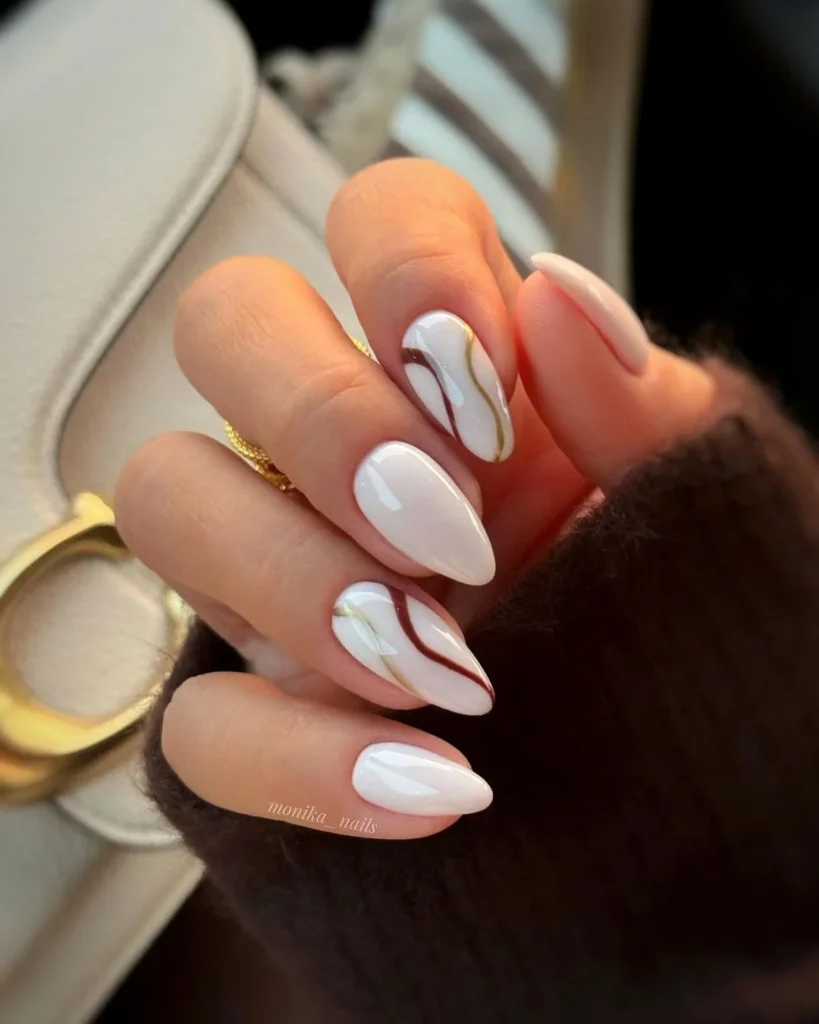
These creamy white nails with gold and burgundy marble swirls feel luxurious and chic, perfect for December soirées. The design is minimal yet festive, making it ideal if you want something elegant but not too loud.
How To Create This Design:
- Apply a clear base coat.
- Paint nails with a solid white gel polish.
- Using a thin brush, draw abstract swirls with burgundy and metallic gold polish.
- Gently blend the edges for a marbled effect.
- Seal with a glossy top coat.
Pro Tip: Use gel polish for the swirls to prevent smudging and achieve that smooth marble finish.
#12. Emerald Green Christmas Nail Style
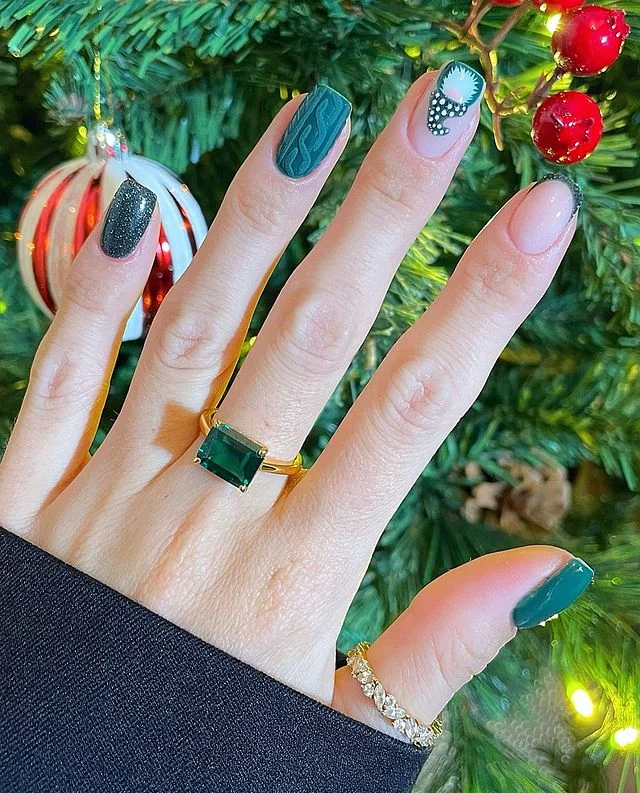
A mix of deep green, glitter, and a playful ornament accent nail gives these nails a true holiday spirit. The look feels classy yet festive, perfect for a Christmas dinner or a night out.
How To Create This Design:
- Start with a base coat.
- Paint nails in alternating shades of emerald green and black glitter.
- Add a 3D ornament accent with white polish and tiny rhinestones.
- Use a detail brush for the fine lines.
- Finish with a glossy top coat.
Pro Tip: Match your jewelry to the green tones for a cohesive holiday look.
#13. Golden Snowflake Nail Look
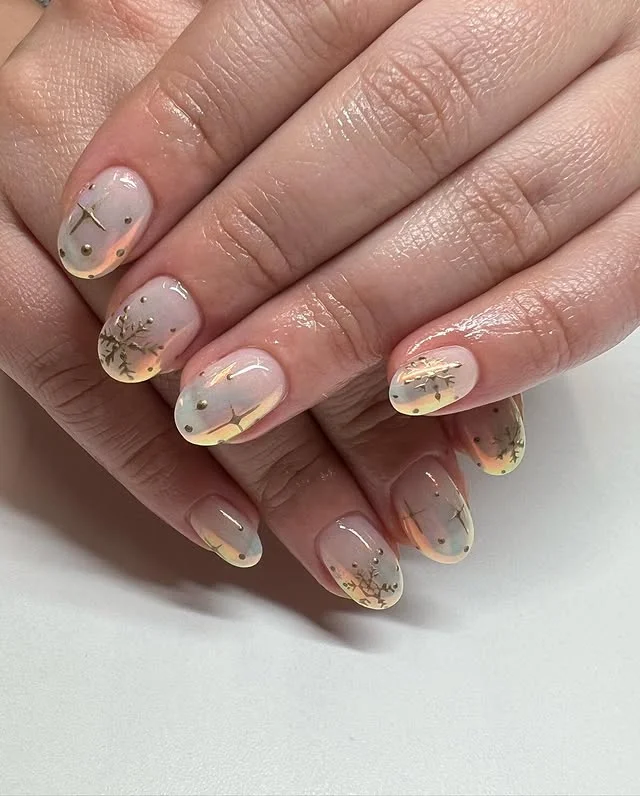
Soft nude tones blended with golden flakes and delicate snowflake art make this design feel like December frost. It’s subtle but magical, the kind of nails that look stunning by candlelight. The gold accents bring warmth while the snowflakes add winter wonder.
How To Create This Design:
- Apply a nude or sheer pink base.
- Sponge on gold chrome flakes at the tips for a frosted gradient.
- Draw snowflakes with white nail polish using a fine nail art brush.
- Add tiny gold studs for extra sparkle.
- Seal everything with a glossy top coat.
Pro Tip: Use a dotting tool to make perfect snowflake dots and starbursts.
#14. Red Gift Bow Nail Design
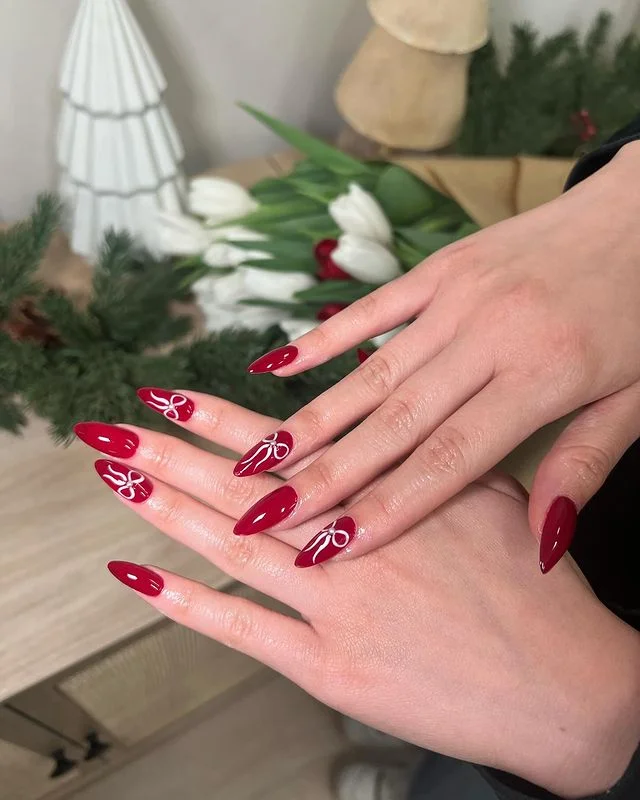
Rich crimson red nails with delicate white bows bring instant festive cheer. They’re playful, bold, and capture the holiday spirit effortlessly. Think of them as little presents you carry with you everywhere this season.
How To Create This Design:
- Apply a base coat.
- Paint all nails with a glossy red polish.
- Use a thin brush or stamping tool to draw white bows on accent nails.
- Add small dots for ribbon details.
- Finish with a clear top coat for shine.
Pro Tip: A striping brush makes drawing precise bow loops much easier.
#15. Burgundy Ribbon French Nail Style
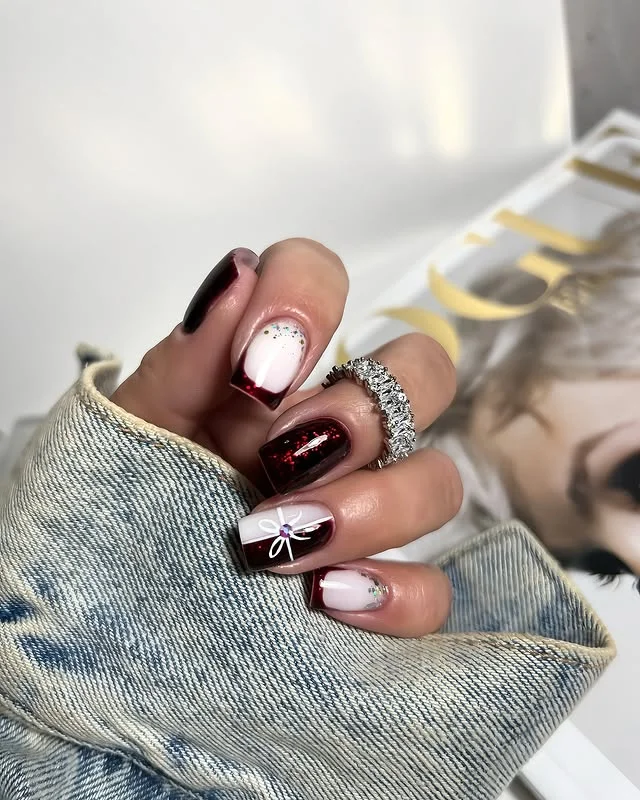
This square-tipped set combines a modern French tip with burgundy ribbons for a chic gift-wrap vibe. It’s festive but polished, perfect for anyone who loves a trendy twist on classics.
How To Create This Design:
- Apply a nude base coat.
- Create burgundy French tips on each nail.
- On accent nails, paint tiny bows and ribbon details in white.
- Add glitter accents for dimension.
- Seal with a top coat.
Pro Tip: Matte top coat over the nude base adds a luxe contrast against glossy burgundy tips.
#16. Candy Cane Christmas Nail Art
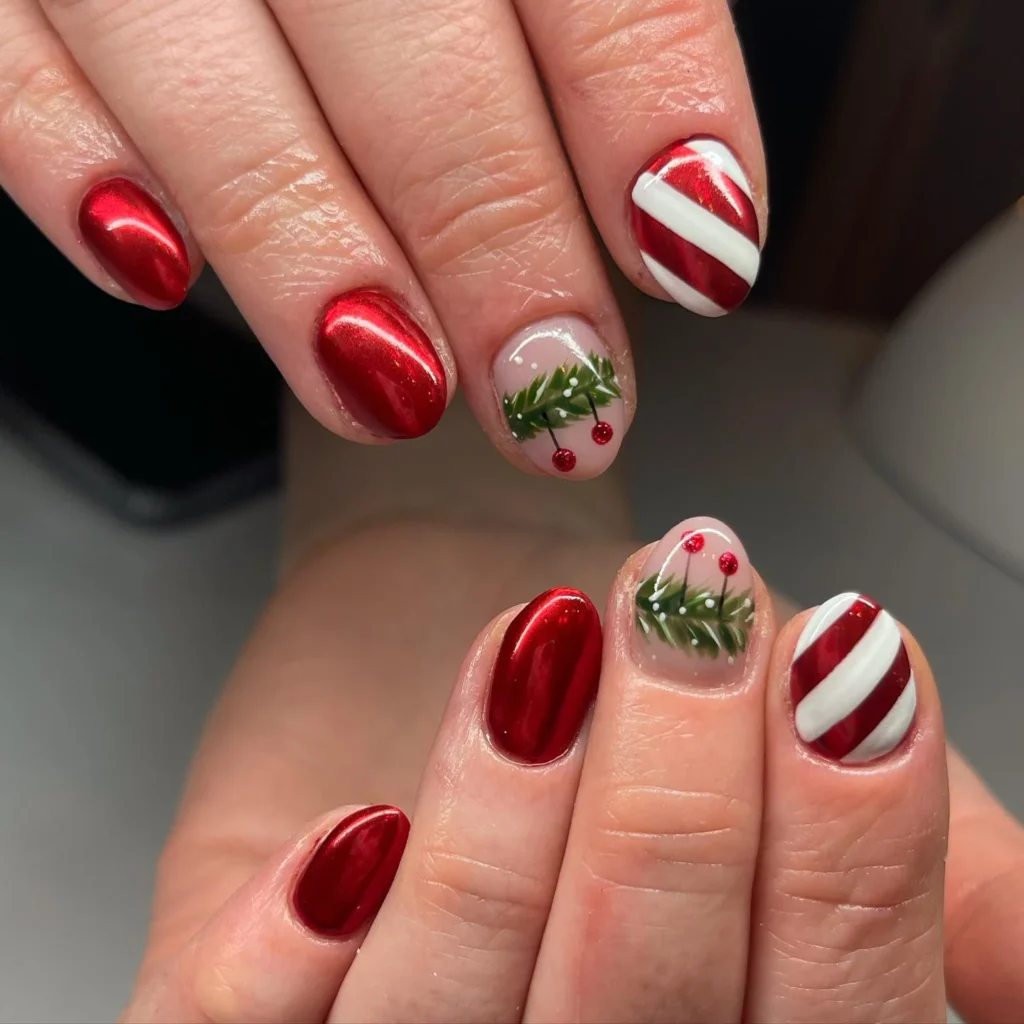
Shiny red metallic polish meets candy cane stripes and mistletoe accents—this set screams Christmas. The mix of playful and glam makes them perfect for holiday parties or cozy gift-unwrapping sessions.
How To Create This Design:
- Paint nails alternately with red chrome polish and nude base.
- Add diagonal white stripes on selected nails for candy cane patterns.
- Hand-paint green leaves and red berry dots for mistletoe accents.
- Top with a glossy sealant.
Pro Tip: Apply striping tape before painting stripes for cleaner candy cane lines.
#17. Silver & Holly Nail Glam
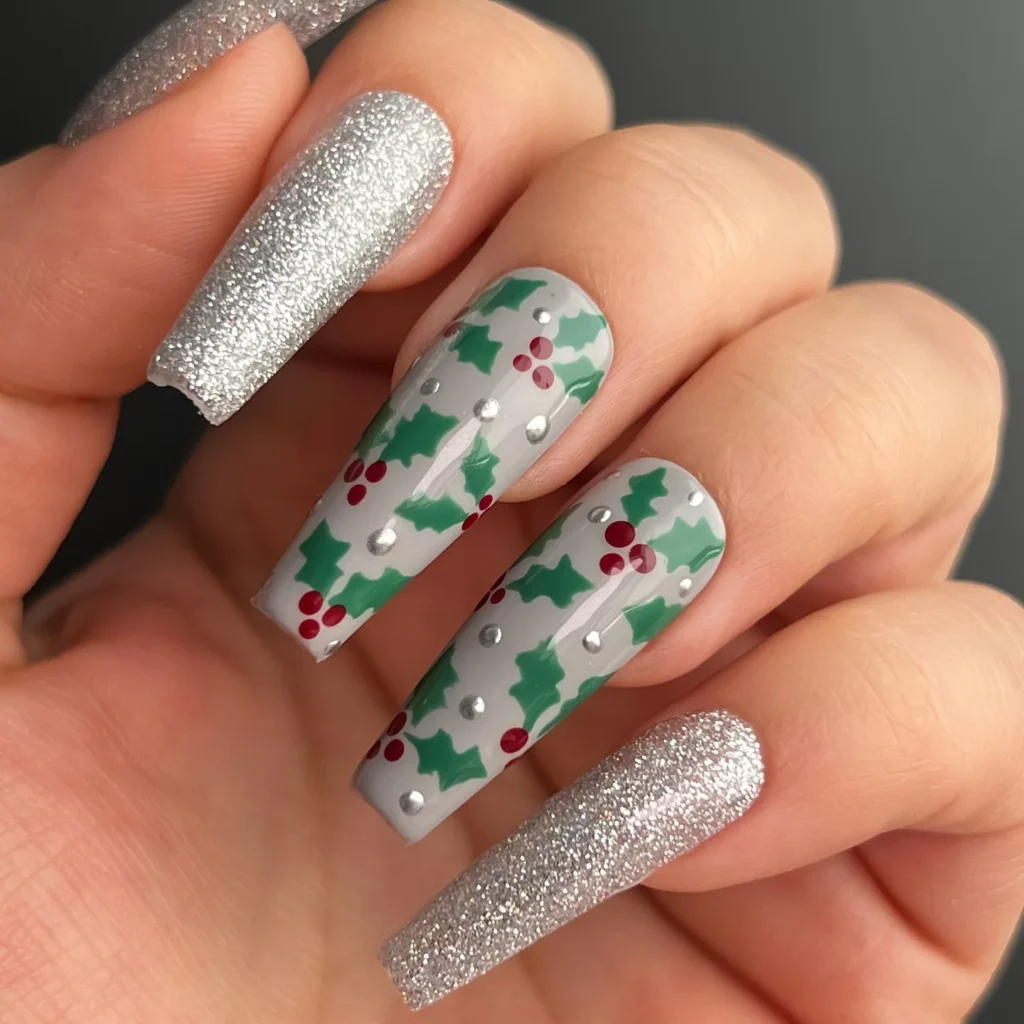
Silver sparkle with green holly and red berries makes this set festive without being over the top. It blends glam and tradition beautifully, looking great under twinkling lights.
How To Create This Design:
- Apply a silver glitter polish to a couple of nails.
- Paint the others in a neutral gray shade.
- Add hand-painted holly leaves with green polish.
- Dot on red berries using a small dotting tool.
- Seal with a glossy top coat.
Pro Tip: Rhinestones can replace berries for extra holiday dazzle.
#18. Festive Plaid Nail Art
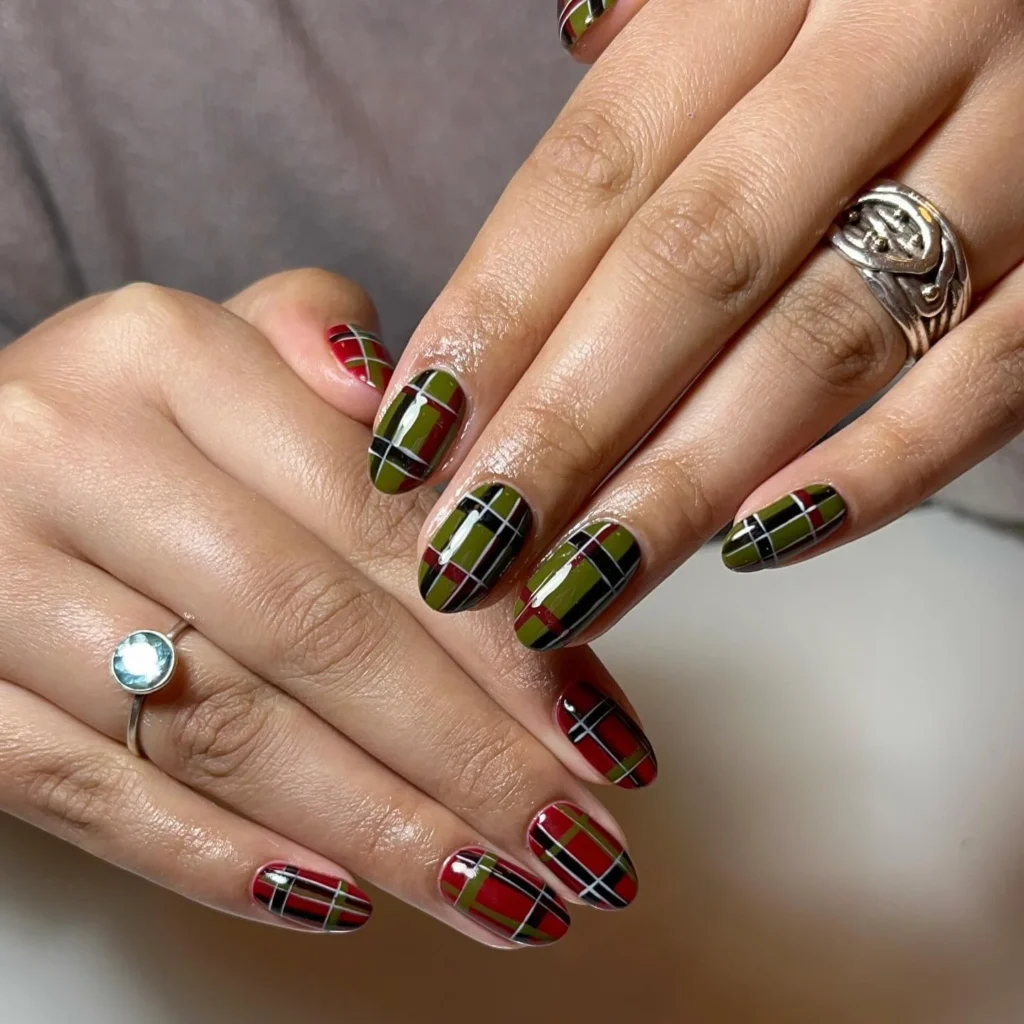
Nothing says cozy December like plaid. With olive, red, and black, these nails feel straight out of a Christmas sweater. They’re bold yet versatile, working for holiday dinners or casual winter days.
How To Create This Design:
- Start with a base coat.
- Paint nails with a neutral base.
- Use thin brushes to layer stripes in green, red, black, and white.
- Let each layer dry before adding the next to avoid smudging.
- Top with a glossy coat.
Pro Tip: Use striping tape for straight, sharp lines in your plaid pattern.
#19. Starry Night Black Nail Look
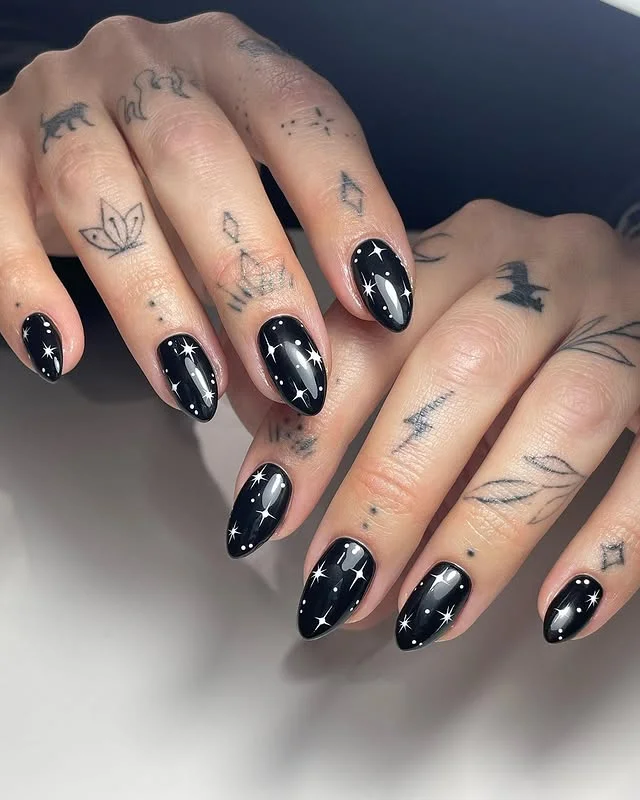
Black nails with dainty white stars bring winter night skies right to your fingertips. They’re sleek, edgy, and elegant all at once—a great option if you like minimal yet striking styles.
How To Create This Design:
- Apply a black gel polish base.
- With a fine detail brush, add small white starbursts across nails.
- Place a few silver glitter dots for extra sparkle.
- Finish with a glossy top coat.
Pro Tip: Apply a matte top coat for a velvety night-sky vibe.
#20. Burgundy Snowflake Nail Style
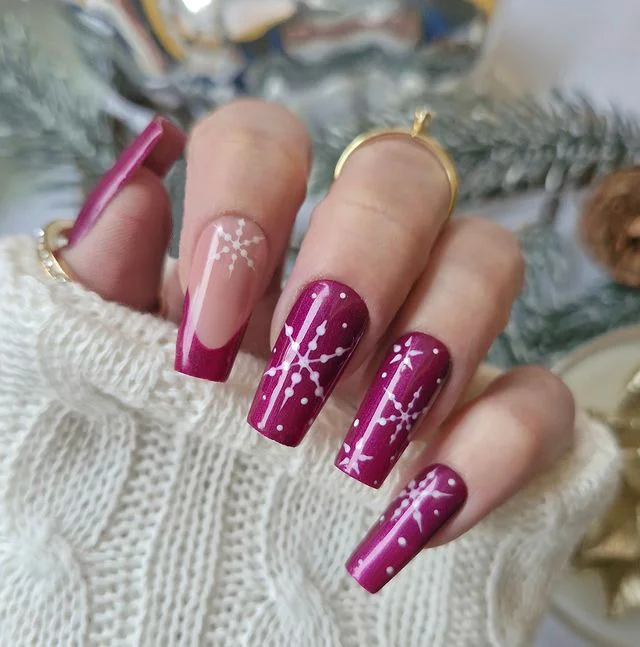
Deep burgundy paired with white snowflake accents makes this look festive and chic. It has a cozy, sweater-weather energy while still being elegant enough for dressy December events.
How To Create This Design:
- Apply a burgundy polish to all nails except one or two accents.
- On accent nails, leave a nude base and add burgundy French tips.
- Use a fine brush or stamping plate to draw delicate snowflakes in white.
- Add tiny glitter dots for sparkle.
- Seal with a glossy top coat.
Pro Tip: To make snowflakes pop, use a stamping plate for perfectly even patterns.
#21. Black Polka Dot Glam Nail Design
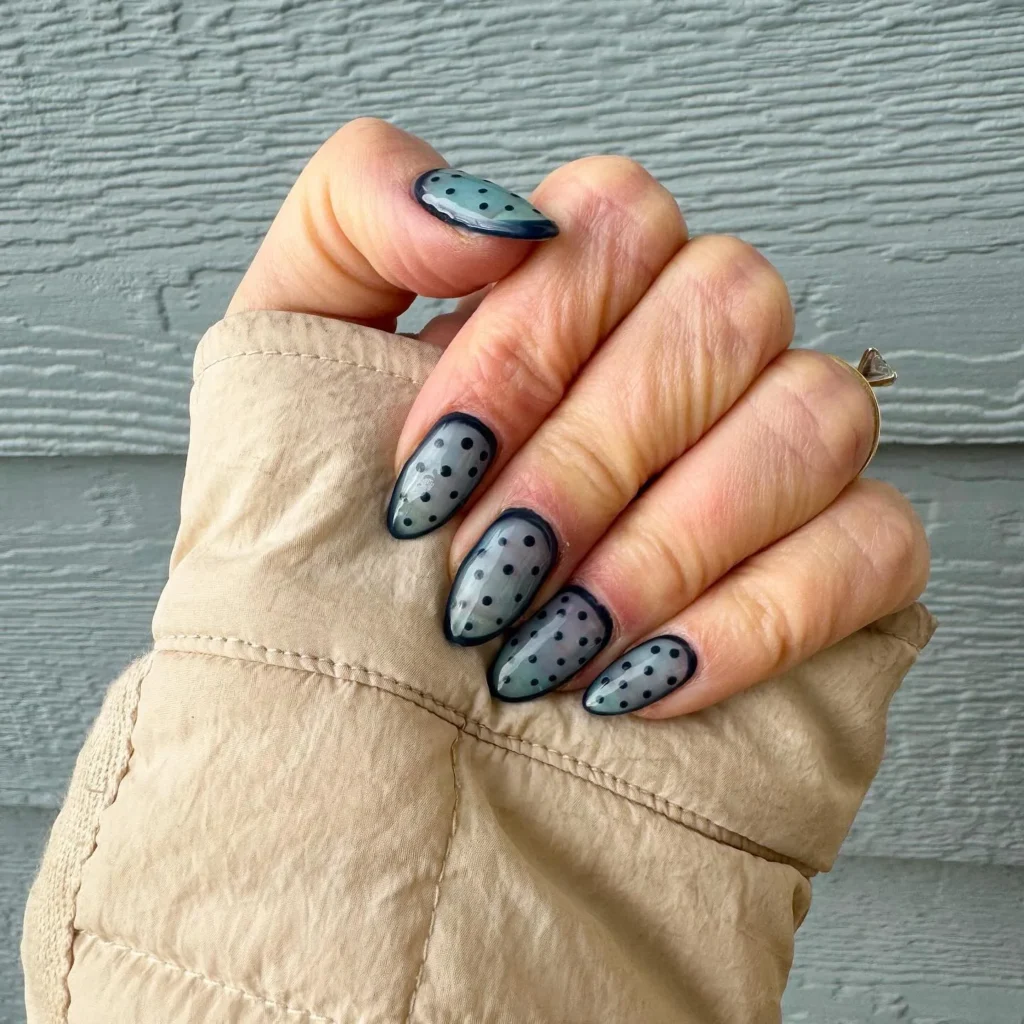
Polka dots never go out of style, and this smoky black-on-gray nail look proves it. The sheer gray base with delicate black dots feels chic yet playful, making it a winter favorite for anyone who loves subtle glam. It’s versatile enough for workdays but stylish enough for nights out.
How To Create This Design:
- Apply a base coat to protect your nails.
- Paint a sheer gray polish as the background and let it dry.
- Using a dotting tool, carefully place black dots evenly across each nail.
- Seal everything with a glossy top coat for a polished finish.
Pro Tip: If you don’t have a dotting tool, the end of a bobby pin works perfectly for creating dots.
#22. Snowy Blue Sparkle Nail Art
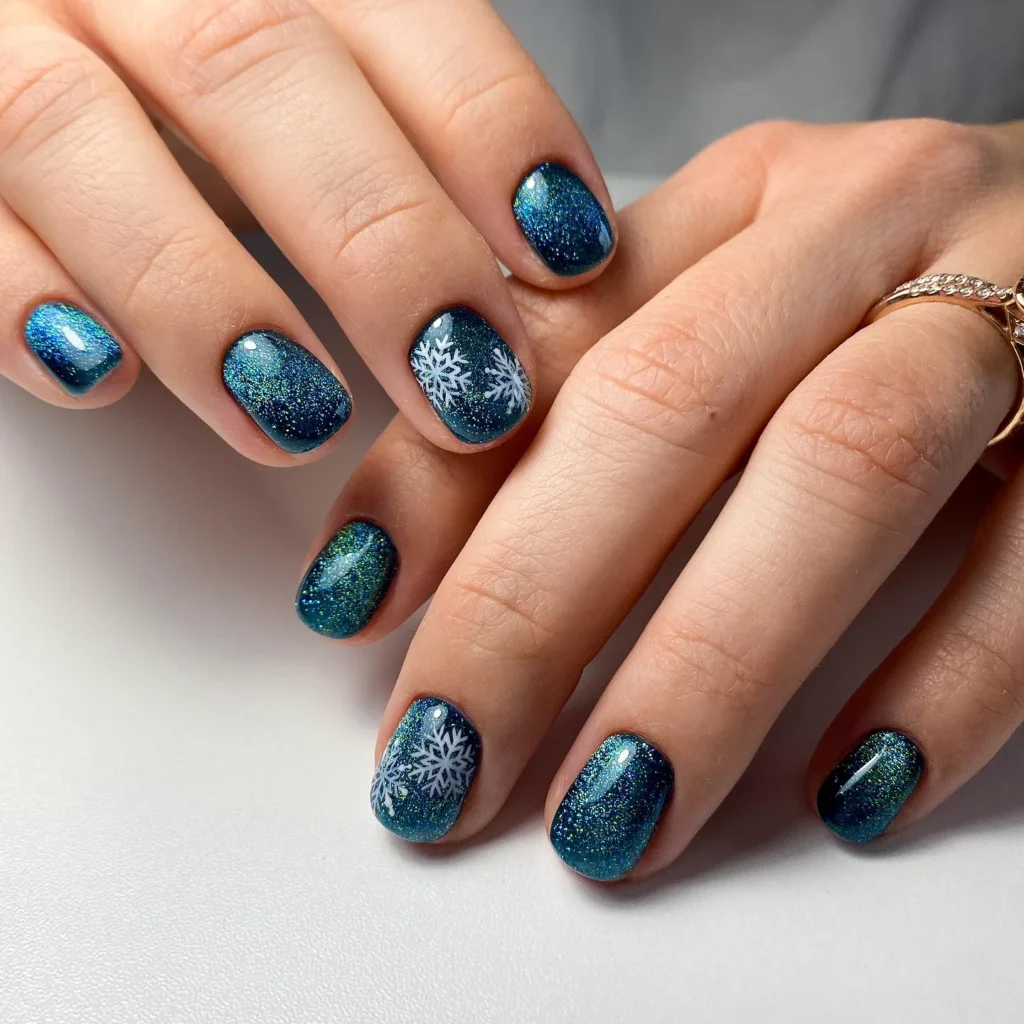
This frosty blue nail look feels like carrying a piece of winter wonderland at your fingertips. The glittery midnight-blue base glows like a starry sky, while the delicate white snowflake accents add a touch of holiday cheer.
How To Create This Design:
- Start with a clear base coat.
- Apply two coats of shimmering blue glitter polish.
- Use a thin detail brush or stamping plate to paint or stamp white snowflakes on a few accent nails.
- Finish with a glossy top coat to lock in the sparkle.
Pro Tip: For an even more frosted look, add a layer of matte top coat over the snowflakes only to create texture.
Conclusion:
As the season wraps us in its sparkle and coziness, these December nail designs remind us that even the smallest details can carry the magic of winter. Whether you’re drawn to shimmering glitters, festive patterns, or subtle elegance, your nails can be the perfect finishing touch to every holiday moment.
So go ahead—pick the look that speaks to you and let your hands join in the celebration. After all, winter magic deserves a little extra shine.

Olivia Tran is the founder and creative force behind TheNailDesigns.