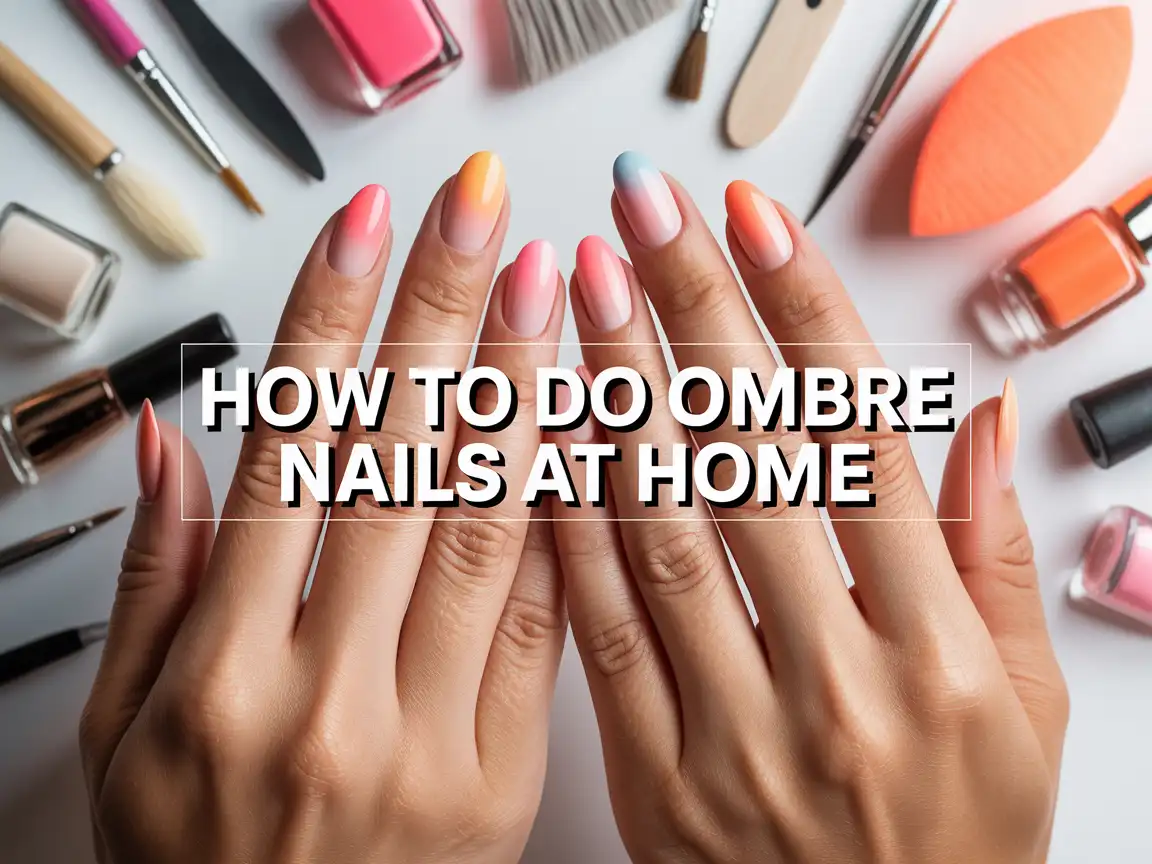
How To Do Gel Nails: Prep Tips That Work
Your gel nails look perfect on day one and then day three shows up like a villain. Lifting at the cuticles, chips at the tips, and that one nail that peels off like a sticker (rude). If this sounds familiar, your problem usually isn’t your polish. Your prep decides everything.
I learned that the hard way after I spent money on “better gel” and still got lifting. Want to know what finally fixed it? I started treating prep like the actual manicure, not the boring warm-up. Ready to make your gel stay put like it pays rent?
Why Prep Makes or Breaks Gel Nails
Gel doesn’t magically bond to your nail because you asked nicely. Gel sticks best when you give it a clean, slightly textured surface and you keep oils far away. Your nails produce oil naturally, and your skincare routine adds even more oil, so gel fights an uphill battle.
When you skip prep, you invite lifting. When you nail prep, you get that smooth, glossy set that lasts two weeks. Ever wondered why salon gel lasts longer than your home set? The prep does most of the heavy lifting.
The Biggest Prep Mistake I See All the Time
People “buff” like they try to sand down a wooden table. Your nail plate needs light texture, not trauma. You want a gentle matte finish, not heat, grooves, or soreness.
I used to over-buff too, and my nails felt weak after removal. Now I buff lightly, and I get better retention plus healthier nails. Funny how doing less gives better results, right?
What You Need Before You Start
You don’t need a suitcase of tools, but you do need the right basics. I keep my gel prep kit in one small pouch so I don’t wander around the house mid-manicure looking for scissors like a lost raccoon.
Gel Nail Prep Essentials
Grab these:
- 180/240 grit nail file for shaping
- Buffer block (fine grit) for light surface prep
- Cuticle pusher (metal or wooden)
- Cuticle nippers (optional, only if you feel confident)
- Lint-free wipes
- Nail cleanser or 70–90% isopropyl alcohol
- Nail dehydrator (optional but super helpful)
- Acid-free primer (optional but great for oily nails)
- Base coat, gel color, and top coat
- UV/LED lamp (a decent one, not the tiny keychain situation)
FYI: A weak lamp causes lifting because gel never cures fully. That “soft cure” feels fine until it peels early.
Optional Add-Ons That Actually Help
These extras can level up your prep:
- Dust brush to clean nails after filing
- Peel-off barrier or liquid latex to protect skin
- Nail clipper for quick length control
- Silicone mat because gel can get messy fast
Ever tried wiping gel off your desk while it cures into a permanent shiny spot? Yeah, avoid that.
Step 1: Start With Clean Hands (But Don’t Use Lotion)
Wash your hands with soap and water, then dry them completely. Keep lotion far away for now. I know, your hands feel dry, and your brain says “moisturize.” Your gel says “absolutely not.”
If you want to moisturize, do it after you finish and cure everything. Oil and gel hate each other. Do you want long-lasting gel or buttery soft hands mid-process? Pick one for the next 45 minutes.
Quick Rule: Avoid These Right Before Gel
Skip these before you start:
- Hand cream
- Cuticle oil
- Heavy sunscreen
- Hair oil (yes, it transfers)
- Makeup remover wipes
Even a little residue can trigger lifting at the edges.
Step 2: Shape Your Nails First (So You Don’t Ruin Your Polish Later)
File your nails into your preferred shape before you touch any gel. Gel seals your edges, so filing after gel breaks your seal and invites chips.
I choose short almond most weeks because it looks clean and it survives daily life. Long coffin looks amazing, but I type and open packages like a chaotic adult, so I keep it realistic.
Shaping Tips That Make Gel Last
Do this:
- File in one direction to reduce splitting
- Keep your shapes consistent across nails
- Smooth your corners so they don’t catch and lift
A clean shape prevents edge stress, and that means fewer chips.
Step 3: Cuticle Prep (The Real Secret to No Lifting)
If gel lifts at the cuticle, you almost always missed cuticle prep. I don’t mean the big visible cuticle. I mean the sneaky invisible layer called cuticle tissue on the nail plate.
Gel cannot bond to that tissue. Gel lifts off it like it slides off a greasy pan. Ever wondered why your gel lifts in a neat little curve near the cuticle? That tissue causes it.
How to Prep Cuticles the Right Way
Follow this order:
- Push back cuticles gently after shaping
- Use a cuticle remover if you like (optional)
- Scrape the nail plate lightly with a cuticle pusher to remove dead skin
- Trim only hanging skin if you use nippers
Don’t chase perfection with nippers. I did that once, and I turned my cuticles into tiny angry paper cuts. Not cute.
Pro Tip: Look From the Side
Tilt your finger and look at the nail plate under light. You’ll often see a thin, shiny film near the cuticle. Remove that film, and your gel retention improves immediately.
Step 4: Buff Lightly (You Want “Velvet,” Not “Sandpaper”)
Buffing creates micro-texture so base coat grips the nail. You only need a light pass. If your nail heats up, you went too hard.
I buff until my nail looks evenly matte. I stop the second I see consistency. Do you want gel to last or do you want your nails to feel thin after removal? Gentle wins.
The “Perfect Buff” Checklist
Aim for:
- Even matte finish
- No shiny patches
- No deep grooves
- No soreness
If you see shine, buff that spot lightly. If you see redness, take a break.
Step 5: Dust Off, Then Clean Like a Mani Scientist
Dust causes bumps and lifting, so clean it off properly. Use a dust brush first, then wipe with alcohol or cleanser using a lint-free wipe.
Don’t touch your nails after this step. Your fingers produce oil fast, and you can sabotage prep in seconds. Yes, even a quick “let me grab my phone” touch can mess things up. Nails stay clean, phone stays dirty, life stays balanced.
A Simple Cleaning Routine That Works
Do this every time:
- Brush off dust
- Wipe nails with cleanser/alcohol
- Let them air dry fully
- Avoid touching the nail plate
Clean nails bond better. This sounds obvious, but it changes everything.
Step 6: Dehydrator and Primer (When You Actually Need Them)
Some people don’t need primer at all. Some people absolutely do. If your gel lifts every time, you probably have oily nail beds, and primer can help a lot.
Nail Dehydrator: Who Needs It?
Use dehydrator if you:
- Live in a humid climate
- Sweat a lot from hands
- Wash hands constantly
- Always get early lifting
Dehydrator removes moisture and oil temporarily so gel adheres better. It feels like a “reset button.”
Primer: When It Saves Your Manicure
Use acid-free primer if you struggle with lifting. Apply a tiny amount and keep it off your skin. Primer improves adhesion, but too much can cause issues.
Here’s my honest comparison:
- Dehydrator: quick oil control and better grip
- Primer: stronger bond, best for stubborn lifters
- Both: great combo for oily nails and long wear
IMO, dehydrator alone works for most people. Primer helps when nothing else sticks.
Step 7: Base Coat Application That Prevents Lifting
Base coat acts like double-sided tape for gel. Apply it thin, and push it close to the cuticle without flooding.
Flooded cuticles cause lifting fast because gel cures on skin and pulls away later. Also, it looks messy. Nobody wants “gel moat” around their cuticles.
Base Coat Rules I Follow Every Time
- Use a thin layer
- Leave a tiny gap at the cuticle
- Cap the free edge
- Cure fully under your lamp
If gel touches skin, wipe it off before curing. That one habit can save your set.
Step 8: The “No Flooding” Technique (So Your Mani Looks Clean)
Want that salon-clean edge? Don’t chase the cuticle line with a big blob of gel. Instead, use less product and nudge it gently.
A Simple Method That Works
Try this:
- Place gel slightly away from the cuticle
- Push it toward the cuticle with the brush gently
- Stop before it touches skin
- Cure immediately
This technique keeps your lines crisp and your gel secure. Ever noticed how gel lifts from the sides first when you flood them? Now you know why.
Step 9: Cure Properly (Because Half-Cured Gel = Problems)
A proper cure makes gel hard and stable. A poor cure makes gel soft underneath, and it peels early.
If your gel wrinkles, dents easily, or feels rubbery, your lamp or cure time needs attention. Don’t blame yourself. Blame the lamp. It deserves it.
Signs You Need a Better Lamp or Better Timing
Watch for:
- Sticky layers that never feel right
- Peeling within days
- Dull top coat
- Soft tips
A quality UV/LED lamp changes the game. You don’t need the most expensive, but you need reliable curing.
Common Prep Problems (And Quick Fixes)
Let’s troubleshoot like friends.
“My Gel Lifts at the Cuticle Every Time”
Fix this by doing:
- Better cuticle tissue removal
- Cleaner application (no flooding)
- Dehydrator + primer combo
- Thinner base coat
Cuticle area lifting almost always comes from prep or flooding. Your gel doesn’t “hate you,” it just hates skin and oil.
“My Gel Chips at the Tips”
Try:
- Cap the free edge on base and top coat
- File shape before gel
- Keep layers thin at the tip
- Avoid using nails as tools (I know, I know)
The tip takes the most abuse, so it needs the strongest seal.
“My Gel Peels Off in One Piece”
That usually means you skipped:
- Buffing evenly
- Cleaning properly
- Dehydrator when you needed it
When gel pops off cleanly, it often means the base never bonded well.
My Go-To Prep Routine (Fast, Simple, Reliable)
When I feel lazy but still want long-lasting gel, I follow this exact routine. You can copy it without thinking too hard.
- Wash hands, dry fully
- Shape nails
- Push back cuticles and remove nail plate tissue
- Light buff to matte
- Brush dust, wipe with alcohol
- Dehydrator (if needed)
- Primer (if needed)
- Thin base coat, cap edge, cure
This routine gives me consistent results. It also saves me from “why did this lift again?” spirals.
Conclusion: Prep Tips That Work for Gel Nails
If you remember one thing from this whole guide, remember this: prep makes gel nails last, not luck. Clean your nail plate, remove cuticle tissue, buff lightly, and keep oils away. Then apply thin layers and cure properly.
Try this prep routine on your next set and watch your gel stay shiny and smooth for weeks. And if you still get lifting after all that, your nails just want a better lamp because nails can be dramatic too.

Olivia Tran is the founder and creative force behind TheNailDesigns.